If you’ve ever wondered “what is the G7 guitar chord?”, you’re embarking on an exciting aspect of guitar playing. This article will guide you through its intricacies, ensuring you can play it confidently and understand its unique place in music.

What is the G7 Guitar Chord?: Understanding it
The G7 chord, often referred to as G dominant 7, is more than just a set of notes strung together. It’s a type of seventh chord, which means it plays a pivotal role in music, creating a depth and complexity that adds emotional resonance to songs.
Let’s delve deeper into what makes the G7 chord unique and essential for any guitarist.
When you play the G7 guitar chord, you are combining four specific notes: G, B, D, and F. Each of these notes has its own role in creating the chord’s distinctive sound:
G (the root note): This is the foundational note of the chord, giving the chord its name and primary tonal base. It sets the stage for the rest of the notes.
B (the major third): Positioned a major third above the G, the B note introduces a brighter, more definitive tone to the chord, contrasting with the root to give the chord its major quality.
D (the perfect fifth): This note adds stability and balance to the chord. It’s called the perfect fifth because it’s five notes above the root in the G major scale, creating a sense of completeness.
F (the minor seventh): The inclusion of the F note is what transforms a standard G major chord into a G7. This note is a minor seventh above the G, introducing a hint of dissonance. This slightly tense, unsettled sound is what makes the G7 chord so compelling and expressive.
The beauty of the G7 chord lies in its ability to create a sense of tension that yearns for resolution. This tension and subsequent resolution are fundamental to many musical progressions, giving songs a dynamic and emotionally engaging quality.
When the G7 chord is played, its slightly dissonant nature creates a musical question that often finds its answer in the following chord, leading to a satisfying resolution that is a hallmark of Western music.
Read more on guitars here – Common Guitar Questions: Guide to “What” Guitar Questions
Step-by-Step Guide to Playing the G7 Chord
Playing the G7 guitar chord may initially seem complex, but with a clear, step-by-step approach, you can master it with ease and confidence. Here’s a guide to help you understand each step:
Positioning Your Guitar
Comfort is Key: Before you even start placing your fingers, ensure that you are holding your guitar in a comfortable and stable position.
Sit or stand in a way that allows you to access the guitar neck easily. Your fretting hand should be able to reach the neck without straining, as this will affect your ability to play the chord accurately.
Guitar Neck Access: Make sure that your guitar is positioned so that the neck is accessible to your fretting hand. If sitting, rest the guitar on your thigh, holding it close to your body. If standing, use a strap adjusted to a comfortable length.
Placing Your Fingers
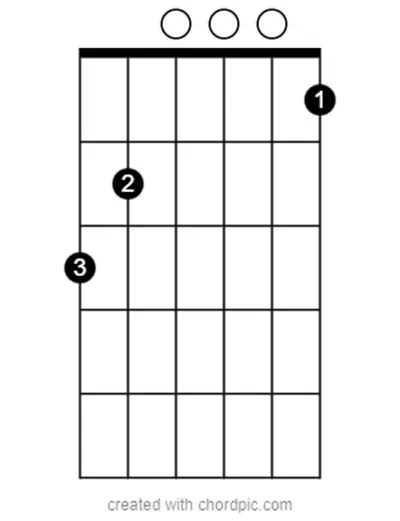
Index Finger: Place your index finger on the first fret of the high E string. This note is F and is crucial in creating the dissonance that defines the G7 guitar chord. Make sure your finger is close to the fret, but not on top of it, to avoid buzzing.
Middle Finger: Your middle finger goes on the second fret of the A string. This is the B note, a major third above the G root note, adding a richer tone to the chord.
Ring Finger: Place your ring finger on the third fret of the low E string. This is the G note, the root of the chord. It’s essential to apply enough pressure to ensure this string rings clearly.
Finger Placement Tips: Keep your fingers arched and fingertips pressing down on the strings. Avoid laying your fingers flat, as this can mute adjacent strings.
Strumming the Strings
Strum with Confidence: Once your fingers are correctly placed, strum all six strings in one smooth motion. The goal is to have each note ring out clearly without any muffled or buzzing sounds.
Adjustments: If you hear any buzzing or muted sounds, stop and check your finger placement. Adjust the pressure, or the position of your fingers, ensuring they are not inadvertently touching other strings.
Practicing Strumming: It may take several attempts to get a clear sound. Be patient and keep practicing the strumming motion, as this is as important as the finger placement.
Remember, mastering the G7 guitar chord requires patience and practice. Each time you play it, you’re not just learning a chord; you’re enhancing your overall guitar skills, finger strength, and musical ear.
As you become more comfortable with the G7, try transitioning to and from other chords to build your chord progression skills.
Common Challenges and Solutions
Learning to play the G7 chord can be a challenging yet rewarding journey, especially for beginners. Understanding and overcoming common obstacles is key to mastering this chord.
Let’s explore these challenges more closely and provide practical solutions to help you progress smoothly.
Muted Strings
The Challenge: One of the frequent issues when learning the G7 guitar chord is encountering muted strings. This usually happens when your fingers unintentionally touch and dampen the adjacent strings, preventing them from ringing out clearly.
The Solution:
Arch Your Fingers: Focus on arching your fingers more. By curving your fingers, you ensure that only the fingertips press down on the strings. This position minimizes the likelihood of your fingers touching adjacent strings.
Finger Positioning: Pay attention to the positioning of each finger. They should be as perpendicular to the fretboard as possible. This will help in isolating each string and allowing it to vibrate freely.
Practice and Adjust: This issue often lessens with practice. As you become more accustomed to the chord shape and your fingers become stronger, maintaining the correct position becomes easier.
Buzzing Sounds
The Challenge: Buzzing sounds are another common problem. They usually occur when the strings aren’t pressed down firmly enough against the fretboard, causing them to vibrate against the frets.
The Solution:
Firm Pressure: Apply more pressure to the strings. Make sure each finger is pressing the string firmly against the fretboard. This doesn’t mean pressing as hard as possible but finding the right amount of pressure to produce a clear sound.
Finger Placement: Check the placement of your fingers. They should be close to the frets but not on top of them. Being too far from the fret can cause buzzing.
Hand Strength and Endurance: Developing finger strength and endurance is a gradual process. Regular practice will naturally improve your ability to apply the right amount of pressure.
Patience and Practice
It’s important to remember that encountering these challenges is a normal part of learning the guitar. Every guitarist, at some point, has faced and overcome these hurdles.
With patience and consistent practice, what once seemed difficult will become more manageable. The key is not to get discouraged. Take your time, be persistent, and soon, playing the G7 guitar chord will feel natural and effortless.
Each practice session brings you closer to mastering not just the G7 chord but also enhancing your overall guitar playing skills.
Conclusion: What is the G7 Guitar Chord?
The G7 guitar chord is a foundational element in guitar playing. While it might seem challenging at first, consistent practice will lead to mastery.
Remember, every guitarist starts somewhere, and learning chords like G7 is a step towards becoming a proficient player. Keep practicing, and soon, the G7 chord will be a natural part of your guitar skills.